
When you install the Acquire Editor, a copy of the Player is also included. You can either use the ‘Preview’ buttons throughout Acquire to view your project, or you can use the Player software in preview mode by pressing ‘Preview’ on the main menu to do a final check before deploying.
If you have configured the player correctly, you should now be seeing the introduction page (media, page, or playlist as you defined). If you are using the Scheduler to schedule different content to different players, you can preview these through the Scheduler or by changing the player settings in ‘Settings’ to play those specific playlists.
When previewing the playlist in this way, interactive content can also be checked. Use the system as you would if the computer was inside a kiosk - If you have a menu structure, use this, or scan a barcode, or insert a coin, or whatever is required to operate the system to test the project works with no ‘missing page’ errors. If you want to jump to a specific page, just type the page ID using the keyboard and press ‘enter’.
Remember, the pages will appear as you configured in the Editor. A common mistake is to set a page display time too short or “forever”. Another common mistake is to configure active areas to jump to incorrect pages. By testing the complete project in this way, these errors can be discovered and rectified before deployment.
Once you are happy that the project works correctly, close the preview option. You now need to transfer this content to your players. You have a choice of three methods: using a memory device such as a pen-drive; or using Point2Point – our peer to peer based solution; or using Acquire’s integrated remote distribution technology, the PLUS! Network.
Visit the PLUS! Network section for more information.
To get the project that you have created on to other machines you will need to ‘Deploy’ it. This checks all the files you have created or changed, combines these files with all of the detail of how you want your project to operate, then wraps this all up in a compressed format which will automatically extract and update on the remote player.
To make a deployment either right click your project and select ‘deploy’, or select from the project menu ‘deploy’.
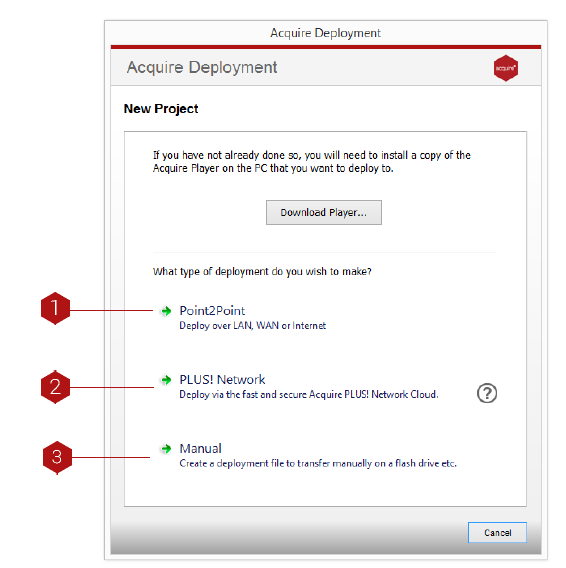
(1). Point2Point
Provides a method whereby files are sent from your computer directly to the each of the remote players in turn. Rather than sending all of the files in the project, Acquire will first detect the files already installed and will update only those files which are new or have been changed.
Choose Point2Point to deploy using this method
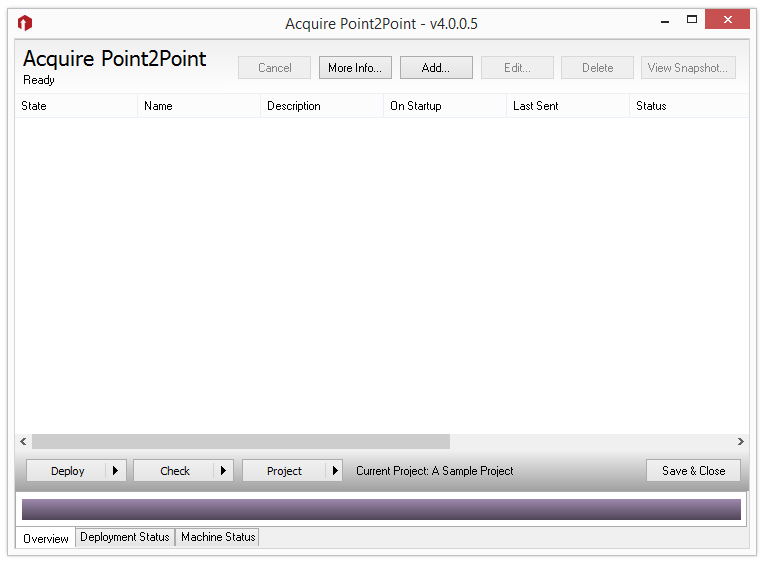
You need to add the players you have to the Point2Point site list.
Press ‘New’ to add a player to the list.
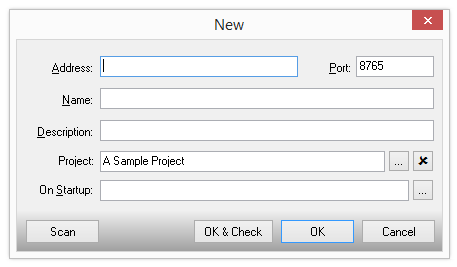
Type in the IP address or URL of the player, and the chosen port and give the player a name you wish to use. If the player is on the same network (LAN) as the editor, press ‘Scan’ and the player will automatically be detected (note that we recommend that the player has a fixed LAN IP address to avoid having to change or rescan for players).
If you do not want this player to use the project settings ‘On Startup’ setting, and instead have its own script to play, you can choose this here now.
Once you have added the players to the list, simply press ‘Deploy to All’ to send the content to all of your players. Shortly after receiving the files, the players will start playing the content you have sent.
HINT.
You can run Point2Point at any time, and press the ‘Check Now’ button (or press the arrow to check regularly).
This will connect to the Point2Point receiver on each of the remote players and check that it is operating. This allows you to check that the remote player is turned on and that the player software is running (although you cannot see or control the actual screen, or be alerted to potential problems as you can with the PLUS! Network).
(2). PLUS! Network: Use the internet to Multicast to all players. If you have subscribed to PLUS! Network then you are able to use it to securely and automatically multicast your content to the remote players. SEE: PLUS! Network section
(3). Manual Deployment
Key
-
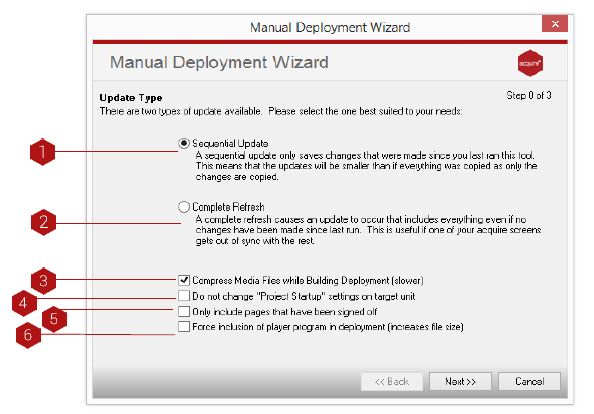
Sequential Update: This deploys ONLY the changes that have been made since the last deployment. This is the most appropriate option in most cases and allows you to transfer projects which are larger than your transfer device. Acquire automatically checks both the database and the media for any changes and only transfers these, ensuring that the deployment is as small as possible. You must have done at least one complete deployment before you can use this feature.
- TIP: Only the updated files are written to the Deployment, so you must ensure that the remote players already have the sequence of updates until this point (For instance, If you have installed new machines from a master backup but not updated the backup). If you are unsure, it is wise to occasionally update using the Complete Update option
- Complete Update: This deploys everything contained in your project.
- Complete Update: This deploys everything contained in your project.
- Do Not Change Project StartUp Settings: Acquire normally changes the remote player’s settings with the ones you have specified for the project on the Editor PC. However, if you have different settings configurations at each player site, you can choose this option to ensure these settings are retained and not over written.
- Only Include Signed Off Pages: If this is selected, ONLY pages that have been signed off using the Sign Off will be included in the deployment.
- Force Inclusion of Player Program in deployment: If you have updated the player program on this PC, Acquire will automatically upgrade the remote player to the same version.
Now all of the options have been set, you are ready to create the deployment. Press ‘Next’ to start the build of your deployment.
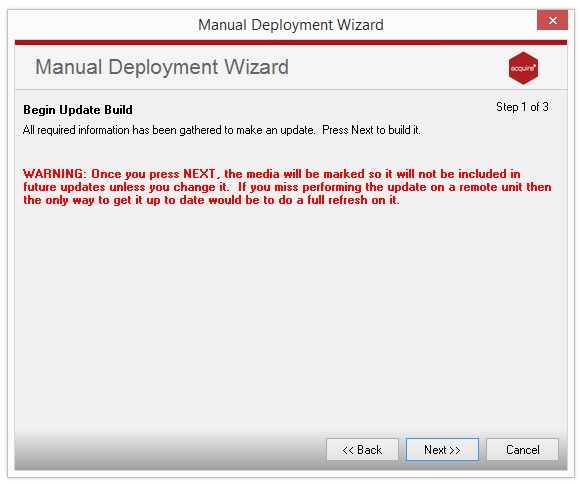
Building the deployment.
This may take a while depending on how large your project is and the options you chose. Acquire will warn you of any possible faults, including missing images, etc.. Once the deployment is completed, you will be shown the next step where you can choose how and where to transfer your deployment to.
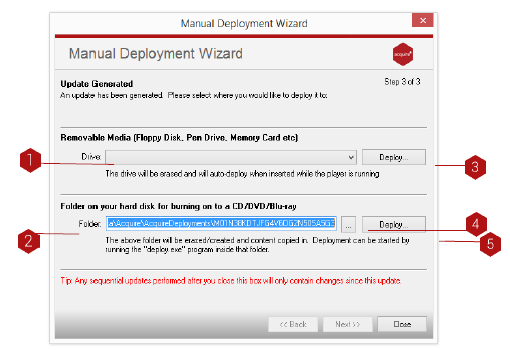
Key
- Select Drive: Here you can select a drive, floppy disk, pen drive, ZIP disk, etc, for the deployment files to go.
-
Folder: Here you can select a folder for the deployment files to go by typing the path of the folder. This can be on either a local or a networked drive. You can then burn the folder to CD/DVD.
- TIP: Once you close this window, the deployment is discarded and the database is reset so that subsequent updates only include the changes made. Make sure you write your deployment before closing the window!
- Deploy to Drive: Once a drive has been chosen (1) select the deploy button to deploy to the chosen folder.
- Browse for Folder: Here you can select a folder for the deployment. Select the Browse button then select a folder. This can be on either a local or a networked drive. You can then burn the folder to CD/DVD.
-
Deploy to Folder: Once a folder has been chosen select the deploy button to deploy to the chosen folder.
- TIP: All files in this folder will be deleted to ensure only the deployment files are contained here. Especially, do NOT choose C:\ or similar.