
(Note: Each user has different access rights and visibility. You may not be able to see this screen or all of the players in your network).

Selecting a Group and Playlist
- Select the group from the drop-down list at the top of the screen. The groups are groups of players and screens which have been pre-defined for you upon setup.
- Use the Add button to create a playlist for the group. The new playlist will be shown below the groups selector.
- Alternatively, select an existing playlist for the group in the drop-down list.
- Use the Add, Del, and Edit buttons to manage the group's playlists.
Group Settings
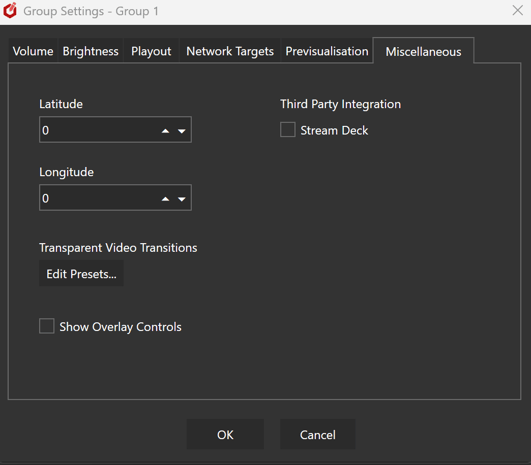
Press the⚙️ button at the top of the screen to open the Group Settings.
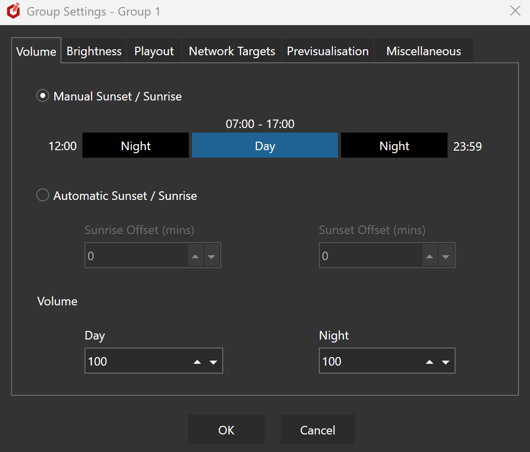
The Group can have options configured to assist in general playout control. In normal use, playlist items can have start/end dates assigned, and for time of day scheduling, the Event mode allows for changing of playlists. However, the groups can also have screen controls assigned to them too using the Group settings. These can be used for overall control of the players, no matter the content being displayed.
- VOLUME This control allows the output Volume to be configured for different times of day. Volume can be set for each area of time in a day (anywhere from 100% to 0%/off), and an option to set a time of day being 'sunrise' and 'sunset' with an offset (so that, e.g. 2 hours after sunset it can switch).
- BRIGHTNESS This control to allow the brightness to be configured for different times of day. Brightness can be set for each area of time in a day, anywhere from 100% to 0% (off), and an option to set a time of day being 'sunrise' and 'sunset' with an offset (so that, e.g. 2 hours after sunset it can switch).
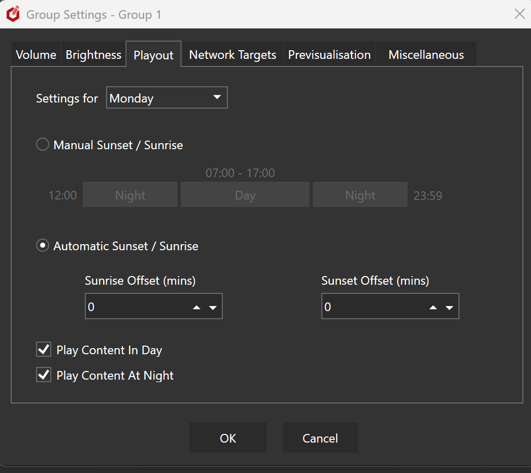
- PLAYOUT This control allows the screen to effectively be turned OFF between times (configured for different days of week). Note that this only affects the output and stops all playback - it does not actually turn off the display device (In the case of LED and OLED/LED backlit display screens, this is sufficient to drastically reduce power to almost zero).
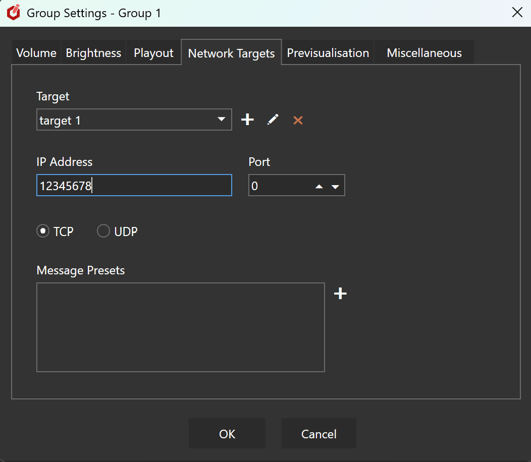
- NETWORK TARGETS This control to allows named Network Targets to be created. A target includes a unique reference name, IP Address, Port and TCP\UPD. Text based message strings can be sent to these Network Target for each row in a playlist (see playlist row settings, below).
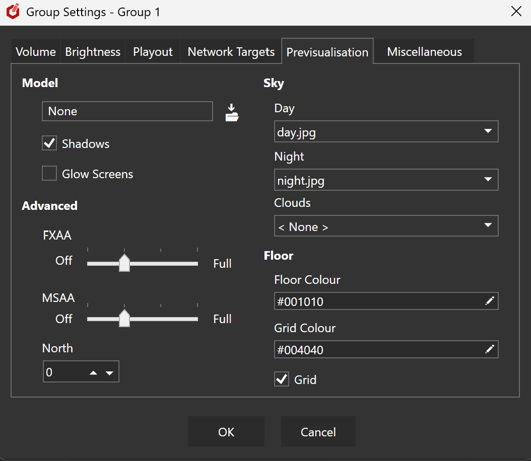
- PREVISUALISATION This control to allows you to configure a previs model. You can import your model, add sky "dome" graphics, and adjust the model's settings.
- Miscellaneous This control to contains various other group settings. You can set the group's latitude and longitude and launch the Transitions Media Presets Editor for transparent video transitions (see own page).
Note: The media repository is a Windows folder stored within the Acquire Editor installed folder. However, you should use the ➕ Import option to copy files from their original folder into the Media Repository and to move files, as the Acquire Advanced Editor automatically creates a thumbnail of the media and also warns you in the case of missing files prior to deployment.
Media Repository
- The bottom section of the screen is the Media Repository. This shows you all the media currently deployed with the project, to be used by all the playlists. Media is dragged from here into the playlists
- Use the🔎filter box to only show file that contains the entered text.
- Use the buttons to manage the media.
📋 - Toggle list\icon view.
📂- Create a new folder.
➕- Import a media file into the project. *
❌- Delete the selected media file from the project (only available to Admin users).
Editing a Playlist
- Playlists are rows of players, as defined in the groups definition file that is part of the project. Each player in the row has a number of outputs i.e. the screens attached to this players' PCs, signified by the columns (backup players are not shown as they mirror the master player). You place media into the the player outputs. The main and backup players PCs will display this media when this row is playing.
-
To place media into an output:
- Drag the media from the Media Repository into the output of a player. You will be warned if the media is an incorrect resolution or not suitable for the output (this can be overridden in the config but is strongly recommended to be enabled).
Hint: you can use CTRL and SHIFT to multi-select media to drag onto the playlist.
- Drag the media from the Media Repository into the player (the area outside of the output, but within the player cell) . The media will then be placed into all of the player's suitable outputs.
- To speed up scheduling, media can also be dragged from an output, to another output or player cell or you can also drag one cell to another to copy the whole cell. If the cells have different format outputs, only the suitable media will be copied.
- You may also drag media from the Media Repository onto the blank space below the playlist to automatically create a row.
- A summary of these settings is shown on the end of the row.
Hint: you can right-click on the summary items to copy and paste them between rows.
Note: copying a transition, that has transition files, between groups might not be able to copy the those files if the groups have different players and\or outputs.
- Playlist rows can be managed using the buttons on the right-hand side of the row:
⬆️- Move the row UP in the playlist (you may also drag the row by dragging the playlist number).
⬇️ - Move the row DOWN in the playlist (you may also drag the row by dragging the playlist number)..
✏️ - Edit the row (see below)
-
⏬ - Add a new row below this one.
- You can add a new media row or another playlist
- If you add a playlist, that sub-playlist will be inserted at this row when the project is deployed, for Advanced Player to play.
- NB Sub-playlists must be the same Synchronisation mode as their perent playlists. Mixing Sync and non-Sync playlists would lead to unpredictable playback results. Any sub-playlists that are a different from their parent will be skipped by the Advanced Player.
- NB Playlists must include themselves as sub-playlists, or include sub-playlists that in turn have the playlist as a sub-playlist. This would lead to infinite playback loops so is not allowed.
❌ - Delete this row. Note that you can not delete the last row.
Overlays
Overlays are groups of "media" items that can play on top of a player's playlist.
They are described Here
Playlist Settings
Press the Edit button at the top of the screen.
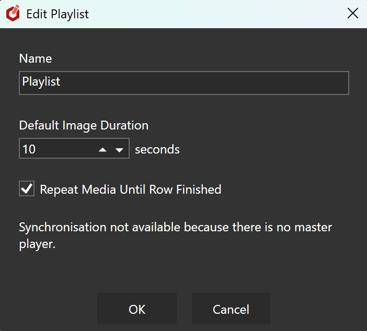
- Name
Change the name of the playlist - Default Row Duration
Used by the Advanced Player when a row's duration can't be determined.
E.g. when it contains images. - Enable Synchronization
By default, all player row durations are synchronized with the master player i.e. their rows keep in time with the master player.
This option allows you to disable that:
- Each player will determine its own row durations and have its own row settings.
- Effectively, each player has its own playlist.
- Only one player at a time will be shown in the Editor, and you can switch between them with the drop-down box at the top of the screen (only appears in when sych disabled)
Editing Playlist Widgets
Playlists can also contain Widgets (see list of available widgets ).
Widgets allow additional services to be used in the playlist rather than just media. Using the Widgets tab, you can view all of the widgets available.
As with media, you can simply drag-and-drop your chosen widget onto a playlist to add it.
If your chosen widget includes configuration options, the configuration screen will appear, allowing you to set up the widget for this point in the playlist.
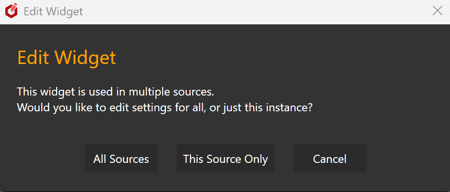
If you drag the widget from it's position in the playlist (or use CTRL+C, CTRL+V to copy it onto another playlist), the settings will also be copied to the new location in the playlist AND be shared. This means, both of the widget items in the playlist will use the same settings, enabling you to make a change and for that change to affect all of the widgets. Alternatively, you can choose to make a new instance of the widget with it's own independent settings.
Important: Widgets operate like a video with respect to how long they are displayed for. Some may have an internal trigger for when they finish, whereas others may need a fixed duration to be selected in the playlist row (See below).
Editing a Playlist Row
Press the ✏️ button on the row to open the Edit Playlist Row dialogue.
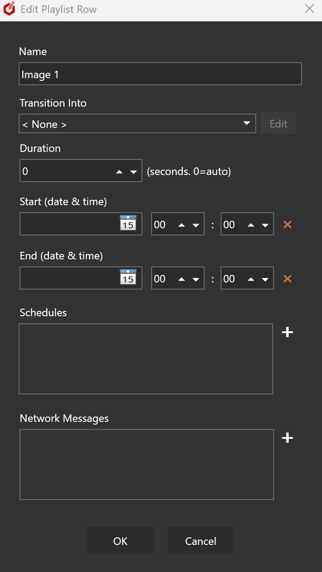
- Name
To help identify content, the row can be named. When adding the first piece of content to the row, the system will name it after this content. You can rename it here. - Transition
A range of transitions can be used and selected here.
Some transitions include additional options which can be configured using the Edit button.
If a transitions requires media per output (e.g. Transparent Video Transition) then separate transition output boxes will appear above the regular ones for the rows that use that transition:
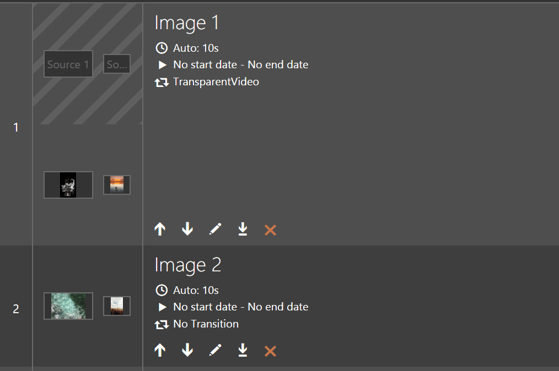
- Duration
The row will play for this number of seconds. If it is 0 the player will work out the duration from the video lengths and/or its default image duration set in the config file. - Start
This can be used to pre-schedule content within a playlist. If set, the row will not play before this date and time. Use the ✖ button to clear it. If pre-scheduling, it is recommended to create a separate playlist and use the Event Mode scheduling feature. - End
If set, the row will not play after this date and time. Use the ✖ button to clear it. - Schedules
Add schedules to restrict the row to only play between a start and end time on specified days.
This is in addition to the above Start and End date scheduling. - Network Messages
Add text messages to send to the Network Targets defined in Group Settings.
Tip - add control characters such as Carriage Return, Line Feed or Tab as a percent encoded string. E.g. "%0D" for a Carriage Return (% followed by the ASCII value in Hex - see Reference section below). You can also insert basic controls via the message text box's context menu. Multiple messages to the same device can be added using delimiters, or by adding them as separate lines. Multiple messages to different devices can be included by pressing the + symbol. Select an existing message to delete or edit it.
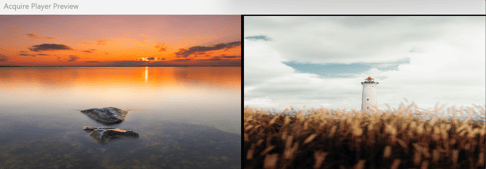
Previewing a Playlist
Press ![]() the button at the top of the screen.
the button at the top of the screen.
Select which player you want to be previewed by selecting.
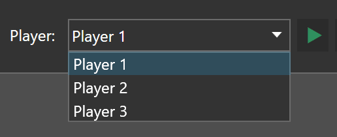
The selected player will be previewed playing the current playlist.
Reference
- ASCII Hex values:
0
00
NUL
1
01
SOH
2
02
STX
3
03
ETX
4
04
EOT
5
05
ENQ
6
06
ACK
7
07
BEL
8
08
BS
9
09
HT
10
0A
LF
11
0B
VT
12
0C
FF
13
0D
CR
14
0E
SO
15
0F
SI
16
10
DLE
17
11
DC1
18
12
DC2
19
13
DC3
20
14
DC4
21
15
NAK
22
16
SYN
23
17
ETB
24
18
CAN
25
19
EM
26
1A
SUB
27
1B
ESC
28
1C
FS
29
1D
GS
30
1E
RS
31
1F
US
32
20
space
33
21
!
34
22
"
35
23
#
36
24
$
37
25
%
38
26
&
39
27
'
40
28
(
41
29
)
42
2A
*
43
2B
+
44
2C
,
45
2D
-
46
2E
.
47
2F
/
48
30
0
49
31
1
50
32
2
51
33
3
52
34
4
53
35
5
54
36
6
55
37
7
56
38
8
57
39
9
58
3A
:
59
3B
;
60
3C
<
61
3D
=
62
3E
>
63
3F
?
64
40
@
65
41
A
66
42
B
67
43
C
68
44
D
69
45
E
70
46
F
71
47
G
72
48
H
73
49
I
74
4A
J
75
4B
K
76
4C
L
77
4D
M
78
4E
N
79
4F
O
80
50
P
81
51
Q
82
52
R
83
53
S
84
54
T
85
55
U
86
56
V
87
57
W
88
58
X
89
59
Y
90
5A
Z
91
5B
[
92
5C
\
93
5D
]
94
5E
^
95
5F
_
96
60
`
97
61
a
98
62
b
99
63
c
100
64
d
101
65
e
102
66
f
103
67
g
104
68
h
105
69
i
106
6A
j
107
6B
k
108
6C
l
109
6D
m
110
6E
n
111
6F
o
112
70
p
113
71
q
114
72
r
115
73
s
116
74
t
117
75
u
118
76
v
119
77
w
120
78
x
121
79
y
122
7A
z
123
7B
{
124
7C
|
125
7D
}
126
7E
~
127
7F
DEL