---
title: Map Editor Routing
description: Map Editor Routing
---
[Skip to content](https://knowledge.acquiredigital.com/map-editor-routing#main-content)
English
Show submenu for translations
[More support](https://knowledge.acquiredigital.com/kb-tickets/new?hsLang=en) [Support Portal](https://knowledge.acquiredigital.com/support?hsLang=en)

Open main navigation
Close main navigation
- English
Show submenu for translations
- [More support](https://knowledge.acquiredigital.com/kb-tickets/new)
- [Support Portal](https://knowledge.acquiredigital.com/support)
- Contact us
Contact us
How can we help you?
- There are no suggestions because the search field is empty.
1. [Acquire Digital Knowledgebase](https://knowledge.acquiredigital.com/?hsLang=en)
2. [Acquire Wayfinder](https://knowledge.acquiredigital.com/acquire-wayfinder?hsLang=en)
3. [Map Editor - Atlas](https://knowledge.acquiredigital.com/acquire-wayfinder?hsLang=en#map-editor-atlas)
# Map Editor Routing
## Using this option gives you more control over Nodes, Routes and Access.
#### 
The default panning tool for Routing mode. Functions identically to the Drag tool in Geometry mode — click and drag anywhere on the map to move the viewport. Does not place or select routing features.


Places routing nodes on the map. Nodes are decision points in the pathfinding network — junctions, corners, and entry points that the routing engine uses to compute paths.
1. Select the **Node** tool
2. Click anywhere on the map to place a node
3. Each click creates one node at the cursor position
4. Nodes appear as circular markers with a highlight ring
5. Click an existing node to select it and open its settings in the side panel

**Node Properties**
When selected, a node's settings panel lets you configure:
- **Open/Closed** — whether the node is available for pathfinding
- **Time Delay** — seconds added when traversing this node
- **Location Description**
- **Dynamic Route** — dynamic route assignment
- **Amenities & Screens** — amenities and displays shown at this node
- **Transit Groups** — floor-to-floor connection groups
Keyboard Shortcut `N`


Draws a line and automatically places routing nodes at regular intervals along it. This is the fastest way to build a routing grid — draw one line across a corridor and nodes are created at the configured spacing with bidirectional joins connecting them.
1. lick to start the line; click additional points to add segments
2. As you draw, tentative node markers appear along the line at the configured spacing
3. Clicking an existing node snaps to it instead of creating a duplicate
4. When the line has 2+ points and you click an existing node, the line completes
5. On finish, nodes are created at intervals along the line
6. Bidirectional joins are created between consecutive nodes
Keyboard Shortcut `L`


1. Click a node to select it as the starting point — it highlights
2. Click a second node to create a bidirectional join between them
3. The starting node remains selected so you can continue joining from it
4. A tentative guide line is drawn from the selected node to the cursor during mouse movement

**Node-to-Unit (Mesh) Join:**
1. Click a node to select it as the starting point
2. Click a unit (not a node) to create a join from the node to that unit
3. The join terminates at the nearest door on the unit's boundary
4. If the unit has no doors, the join uses the unit's display point
5. After the mesh click, the current node is deselected
**Cancelling:**
- Right-click to deselect the current node
- Clicking the already-selected node again does nothing


Places doorway points on the boundary edges of polygon features. Available in both Geometry mode (as an edit action on selected units) and Routing mode (as a standalone tool). Doors tell the routing system where people can enter and exit a destination unit.
**Placing a door:**
1. Hover near the edge of any polygon unit — a snap indicator appears on the nearest edge point
2. The cursor changes to crosshair when a valid snap position is detected
3. Left-click to place a door at the snapped position
4. A visual marker appears on the edge
**Removing a door:**
1. Right-click on an existing door marker
2. The door is removed from the feature's
3. Any joins using that door are re-evaluated to the next closest door

**How Doors Connect to Joins:**
When creating a join between a node and a unit, the system finds the nearest door on that unit. The join terminates at the door position rather than the unit centre. If a unit has no doors, joins fall back to the unit's display point.
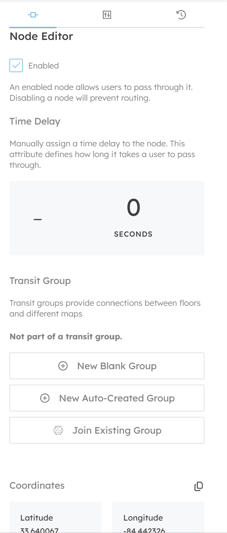
By selecting a Node the **Node Editor appear**s, this allows you to add transit, time delay as well as Advanced Settings and Activity.
- [Software Installers](https://knowledge.acquiredigital.com/software-installers?hsLang=en)
- [StudioDX & DX Player](https://knowledge.acquiredigital.com/studiodx-dx-player?hsLang=en#main-content)
- [Studio DX FAQ's](https://knowledge.acquiredigital.com/studiodx-dx-player?hsLang=en#studio-dx-faqs)
- [Acquire StudioDX User Documentation](https://knowledge.acquiredigital.com/studiodx-dx-player?hsLang=en#acquire-studiodx-user-documentation)
- [User Guide](https://knowledge.acquiredigital.com/studiodx-dx-player?hsLang=en#user-guide)
- [Widgets](https://knowledge.acquiredigital.com/studiodx-dx-player?hsLang=en#widgets)
- [Transitions](https://knowledge.acquiredigital.com/studiodx-dx-player?hsLang=en#transitions)
- [Warning Alerts](https://knowledge.acquiredigital.com/studiodx-dx-player?hsLang=en#warning-alerts)
- [Setup App](https://knowledge.acquiredigital.com/studiodx-dx-player?hsLang=en#setup-app)
- [Project Apps](https://knowledge.acquiredigital.com/studiodx-dx-player?hsLang=en#project-apps)
- [StudioDX Stream Deck Plugin](https://knowledge.acquiredigital.com/studiodx-dx-player?hsLang=en#studiodx-stream-deck-plugin)
- [XML Formats](https://knowledge.acquiredigital.com/studiodx-dx-player?hsLang=en#xml-formats)
- [Acquire Wayfinder](https://knowledge.acquiredigital.com/acquire-wayfinder?hsLang=en#main-content)
- [Map Editor - Atlas](https://knowledge.acquiredigital.com/acquire-wayfinder?hsLang=en#map-editor-atlas)
- [Devices](https://knowledge.acquiredigital.com/acquire-wayfinder?hsLang=en#devices)
- [CMS User Management](https://knowledge.acquiredigital.com/acquire-wayfinder?hsLang=en#cms-user-management)
- [Project Settings](https://knowledge.acquiredigital.com/acquire-wayfinder?hsLang=en#project-settings)
- [The Map Editor](https://knowledge.acquiredigital.com/acquire-wayfinder?hsLang=en#the-map-editor)
- [JS Web Map UI V2.0](https://knowledge.acquiredigital.com/acquire-wayfinder?hsLang=en#js-web-map-ui-v2-0)
- [JS Web Map API V2.0](https://knowledge.acquiredigital.com/acquire-wayfinder?hsLang=en#js-web-map-api-v2-0)
- [JS Web Directory API V1.0](https://knowledge.acquiredigital.com/acquire-wayfinder?hsLang=en#js-web-directory-api-v1-0)
- [Wayfinder Map API](https://knowledge.acquiredigital.com/acquire-wayfinder?hsLang=en#wayfinder-map-api)
- [Broadsign Integration](https://knowledge.acquiredigital.com/acquire-wayfinder?hsLang=en#broadsign-integration)
- [Adverts Plugin](https://knowledge.acquiredigital.com/acquire-wayfinder?hsLang=en#adverts-plugin)
- [Wayfinder FAQs](https://knowledge.acquiredigital.com/acquire-wayfinder?hsLang=en#wayfinder-faqs)
- [Beacon](https://knowledge.acquiredigital.com/beacon?hsLang=en#main-content)
- [Devices](https://knowledge.acquiredigital.com/beacon?hsLang=en#devices)
- [Layouts](https://knowledge.acquiredigital.com/beacon?hsLang=en#layouts)
- [Information Displays](https://knowledge.acquiredigital.com/beacon?hsLang=en#information-displays)
- [Playlists](https://knowledge.acquiredigital.com/beacon?hsLang=en#playlists)
- [Project Settings](https://knowledge.acquiredigital.com/beacon?hsLang=en#project-settings)
- [Activity Logs](https://knowledge.acquiredigital.com/beacon?hsLang=en#activity-logs)
- [Acquire DOOHAD](https://knowledge.acquiredigital.com/acquire-doohad?hsLang=en#main-content)
- [DOOHAd Standalone Installer & Advert Configuration Tool](https://knowledge.acquiredigital.com/acquire-doohad?hsLang=en#doohad-standalone-installer-advert-configuration-tool)
- [DooHad FAQs](https://knowledge.acquiredigital.com/acquire-doohad?hsLang=en#doohad-faqs)
- [Acquire Vision User Guide](https://knowledge.acquiredigital.com/acquire-vision-user-guide?hsLang=en)
- [Acquire StudioDX & Wayfinder Trial Install Guides](https://knowledge.acquiredigital.com/acquire-studiodx-wayfinder-trial-install-guides?hsLang=en#main-content)
- [Acquire Wayfinder Trial](https://knowledge.acquiredigital.com/acquire-studiodx-wayfinder-trial-install-guides?hsLang=en#acquire-wayfinder-trial)
- [Acquire StudioDX Trial Installation Guide](https://knowledge.acquiredigital.com/acquire-studiodx-wayfinder-trial-install-guides?hsLang=en#acquire-studiodx-trial-installation-guide)
- [Acquire Assist](https://knowledge.acquiredigital.com/acquire-assist?hsLang=en)
- [Acquire Premier](https://knowledge.acquiredigital.com/acquire-premier?hsLang=en#main-content)
- [Quick Start Guide.](https://knowledge.acquiredigital.com/acquire-premier?hsLang=en#quick-start-guide)
- [Acquire Editor User Guide](https://knowledge.acquiredigital.com/acquire-premier?hsLang=en#acquire-editor-user-guide)
- [Toolbox](https://knowledge.acquiredigital.com/acquire-premier?hsLang=en#toolbox)
- [The PLUS! Network](https://knowledge.acquiredigital.com/acquire-premier?hsLang=en#the-plus-network)
- [Acquire Site Manager](https://knowledge.acquiredigital.com/acquire-premier?hsLang=en#acquire-site-manager)
- [Apps & Helpers Manuals](https://knowledge.acquiredigital.com/acquire-premier?hsLang=en#apps-helpers-manuals)
- [Minute Master-Classes](https://knowledge.acquiredigital.com/acquire-premier?hsLang=en#minute-master-classes)
- [Acquire Editor FAQs](https://knowledge.acquiredigital.com/acquire-premier?hsLang=en#acquire-editor-faqs)
- [Acquire Player FAQs](https://knowledge.acquiredigital.com/acquire-player-faqs?hsLang=en)
- [Site Manager](https://knowledge.acquiredigital.com/site-manager?hsLang=en#main-content)
- [Site Manager User Guide](https://knowledge.acquiredigital.com/site-manager?hsLang=en#site-manager-user-guide)
- [Site Manager FAQs](https://knowledge.acquiredigital.com/site-manager?hsLang=en#site-manager-faqs)
- [Watchdog](https://knowledge.acquiredigital.com/watchdog?hsLang=en#main-content)
- [Watchdog User Guide](https://knowledge.acquiredigital.com/watchdog?hsLang=en#watchdog-user-guide)
- [Watchdog FAQs](https://knowledge.acquiredigital.com/watchdog?hsLang=en#watchdog-faqs)
- [FAQs](https://knowledge.acquiredigital.com/faqs?hsLang=en)
[](http://acquiredigital.com)
[mailto:email@email.com](mailto:email@email.com)
Copyright © 2026, Acquire Digital