
If you want to show a 'blank screen', it is recommended to use a 'black' image (PNG or JPG, etc) and use that in the playlist when you wish to use it (of course, you can always schedule the screen and playout to stop output using the settings for the group).
There is a reason you may wish to leave empty spaces in your playlists though - you may have display outputs you wish to control over the whole space, or as individual sections. Think of a display which has mixed LED pixel pitch above a certain height - you may wish to control the whole sign on one row, then have the sign show different content on the top vs the bottom sections of the screen on another row; or maybe three 'legs' to a sign, where each leg contains a different piece of content or sometimes you wish each leg to be a third of a larger piece which makes up a whole across all three.
In those circumstances, you would add content solely to the 'all' media space, OR to the individual spaces - and by leaving an empty space you will receive a warning (so "Playlist Issues") when showing Preview, Previs or deploy.
Example Warning.
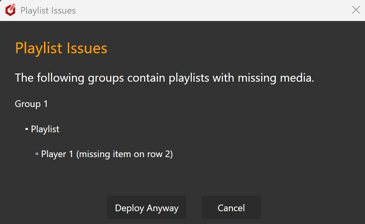
To prevent the warning from showing, you can disable the warnings in one of two ways:
Option 1 : Edit the playlist file.
Close the editor. Using a text editor (e.g. Notepad or Notepad++), browse to the folder for the project.
Example:
C:\ProgramData\Acquire\00M1SHTOFTA4HDHC9RNUF962Q5\media\Always Send
and find the file "playlists_editor.xml" and open it.
Look for the part in the playlist where a playlist's settings are configured (search for "enableSync") and add a new entry cms_ignoreValidation = "True"

If set to True, this playlist won't be validated, but others without this setting will, so you should add it to all the playlists in this file you wish to allow empty parts or you might still get a warning.
The benefit of this option is you are able to enable it only for the specific playlists you want to allow, whilst still allowing warnings for others.
Option 2 : Change via Global registry setting
This is a total override for all playlists and projects. This setting is made in the computer's Registry.
NOTE: if you are unfamiliar with editing registry settings, we advise you to use the method above as you are able to change other aspects of how your computer operates or even stop it working altogether.
we accept no responsibility for any changes made to the registry.
Close the Editor. press the Windows key on the keyboard and type 'Regedit' - you will be shown the Windows menu with 'Registry Editor' as the top most option. Click on it (You may need to right click on this and choose 'run as admininstrator if you have multiple users on your computer). Using the Registry Editor navigation on the left, find the section. HKEY_LOCAL_MACHINE\\Software\WOW6432node\Working Solutions\\AcquireAdvanced\\
Right click on the right-hand area and select 'New' then 'String Value'. Give the new string value key a name of "ignoreValidation" and press enter. Right-click on this new string value and choose 'Modify'. Add the text "true" to the Value data and press OK.

This is a great 'catchall' for all settings.
Note: that if using this method, NO playlist will be validated regardless of their xml cms_ignoreValidation setting (see above)