
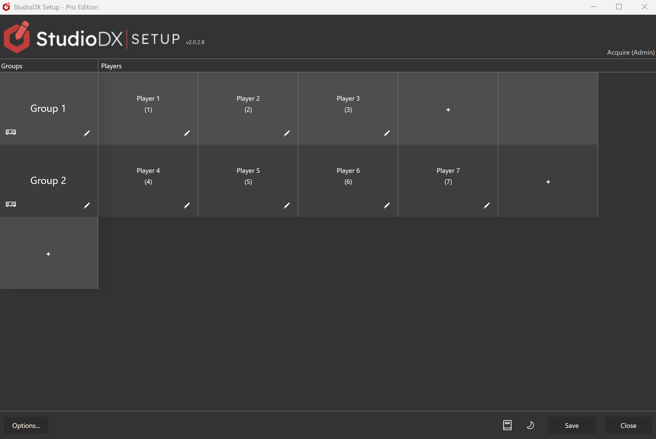
- Press the ➕ button in the Groups column to add a group.
You can then press the press the ✏️ or double-click the group to edit it.
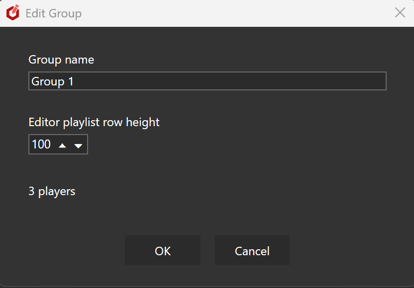
Editing the group will let you rename it and set the row height of the playlist when they are showing in the Acquire Advanced Editor.
⚠️ If you change the name of group which already has playlists assigned to it, those playlists will be lost.
- Press the ➕ button in the Group's Players row to add a new player to that group.
- You can then press the press the ✏️ or double-click the player to edit it.
- Editing a player will open a new screen.
- This is described in the Player Editor Screens section of this document.
- Options...
This button will open the general options window.
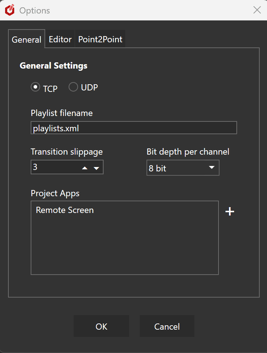
You can set:
- If the Player and Editor should use TCP or UDP for network communication.
- The playlist filename. Recommended to leave as "playlists.xml"
- Playlist transition slippage and bit depth per channel.
- Automatically add new players to Point2Point
- Manage Project Apps
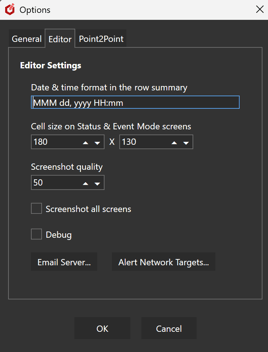
- The format of the date\time as shown in the Editor's row summary.
- The size of the cells in the Editor's Status and Event Mode screens.
- (this size will also be used here in the groups\players screen)
- Screenshot quality, and whether to screenshot all player screen or just the main one.
- Turn extra debugging on on the Editor e.g. more logging.
- Set up an email server for Warning Alerts.
- Set up Alert Network Targets.
- Light\Dark Mode
- The themes button works the same way as in the Editor.
- Save
- This will validate and save all your settings into the project.
- Close
- This will close the configuration app.