
To create a project click Project > Add > and fill out the details of your project, as seen in the screen below:
Here you can define your project settings.
Project Settings
Project Settings allows you to define how a specific project will operate.
Project Options tab.
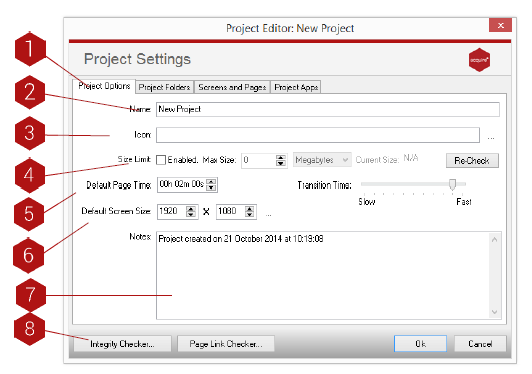
Key
- Tabs: There are different project settings in each of the tabs.
- Name: Name your project.
- Icon: Give your project an icon to make it easily identifiable.
- Size Limit: Set a size limit for your project.
- Default Page Time: Set the default page time. This can be changed for each page.
- Default Screen Size: Set a default screen size. This can be changed at a later date.
- Notes: Include notes about your project.
- Integrity Checker: Click here to open the Integrity Checker. Acquire’s project tidying/maintenance system.
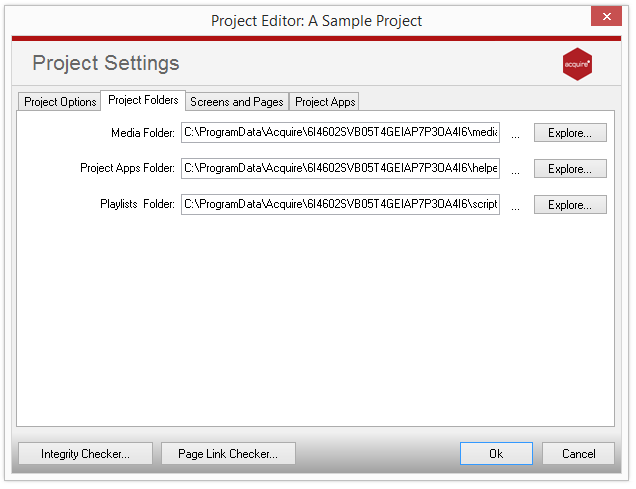
Project Folders tab
Use this tab to change the locations of where your assets are stored.
-
Media Folder: Choose the folder where the media files are stored on your computer.
-
Project apps Folder: Choose the folder where any apps for this project will be stored.
-
Playlists Folder: Choose the folder where you wish to store your playlists for this project.
IMPORTANT NOTE: The folder names for the Media, apps and Playlists Folders can be anywhere on your hard drive or network. However, please ensure that they only contain these items, otherwise deployment and directory lookups will be very long. For instance, selecting the C:\ folder for your media will cause Acquire to scan every sub-folder on your hard drive for content when deploying! Instead, make a sub-folder for the project and then three sub-folders within this named ‘Media’, apps’ and ‘Playlists’ - this way you only need to copy the finished content into these and you know that it is all in there and not scattered around the drive. This is similar to website development where you create separate HTML and Content folders.
TIP: By default Acquire creates a uniquely named folder in ‘C:\Program Files\Acquire\ or C: \ProgramData\Acquire\’ which stores your media per project. To make finding the respective folders easier, Acquire has also installed a new column in Windows Explorer which will show the project name next to the folder name for you. To see this, browse to the ‘Acquire’ folder and choose the ‘Details’ view. Then, right-click on the column headings and choose ‘more...’ on the dialogue that appears. Here you can choose the columns that are displayed. Towards the bottom of this list you will find a column called ‘Acquire Project Name’. Ensure that this is ticked, and move it in the order you want it displayed.
Screens and Pages tab
This tab contains the same settings that can be found in the player software. It allows you to select the control screens used within your project and dictate how they operate. For instance, an interactive system may start with a menu screen on start-up and use an ‘Are you still there?’ page when the user leaves the unit unattended. However, if the system is to run a passive sequence of screens, then Acquire can be configured to show a playlist of pages at start-up and will not need an ‘Are you still there?’ graphic.
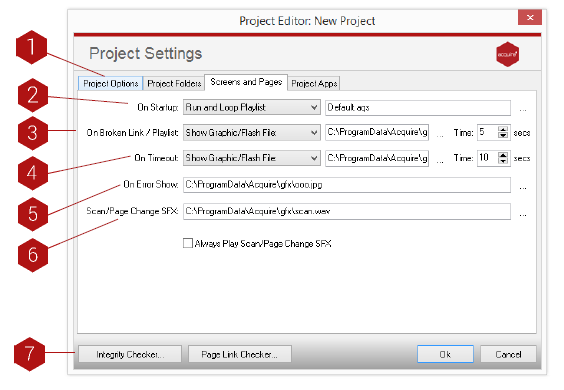
Key
- Tabs: Choose the different setting and features available for this project by clicking the respective tab.
- On Start-up: Here you select either a playlist, a page ID or a graphic to play when the project starts up in the Acquire Player. Choose an appropriate file, page or playlist to play in the box to the right.
- On Broken Link / Playlist: Set a page or graphic in your project in the event of a broken link or playlist.
- On Timeout: Set a page or graphic in the event our your project timing out.
- On Error: Set a page or graphic in your project in the event of an error.
- On Scan/Page Change SFX: Set an audio file to play when the screen is changed or a product is scanned.
- Integrity Checker: Click here to open the Integrity Checker. Acquire’s project tidying/maintenance system.
Project Apps tab
Acquire Project Apps are programs that run in the background allowing extra functionality to be included. They can also allow interaction with external programs/data sources.
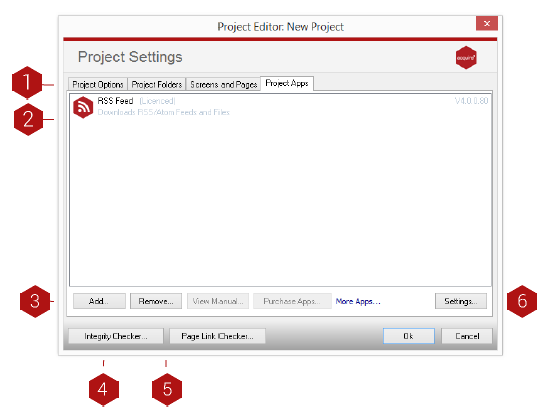
Key
Tabs: Choose the different setting and features available for this project by clicking the respective tab.
- App List: All Apps displayed for your project.
- Add: Click to add a new app. A browse window will open where you can select an app to add.
- Integrity Checker: Click here to open the Integrity Checker. Acquires’ project tidying/maintenance system.
- Remove: Click to remove an existing app by highlighting it in the list then clicking ‘Remove.’
- Settings: Each app has its own settings. You can access these settings by clicking here. This will open a configuration window.