
If this is the first time you run it, you should see a welcome animation if you have not yet deployed your project. Note that a copy of the player is also included with the Editor and can also be run there for a complete test if you do not have a specific ‘test’ player on your site.
Once the Player software is running, two keys which you will find useful are the ESC key, which displays the engineer settings menu, and the Alt-F4 (press the ALT key and the F4 key together) which exits the program.

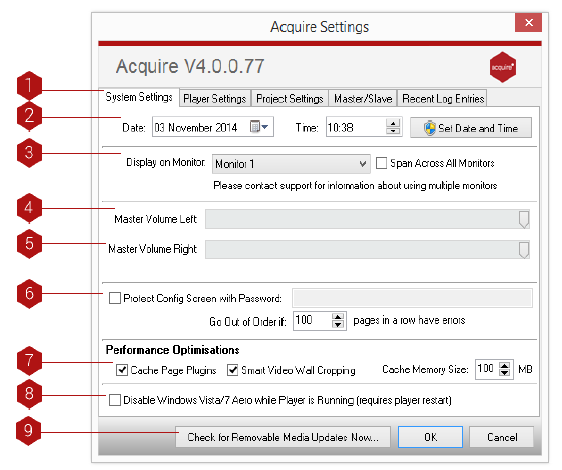
System Setting tab
Key
- Settings Tabs: Here is where you can select which Configuration Setting you would like to change/view.
-
Date: Here you can select/change the date on the computer.
- TIP: We recommend setting the time on the remote players to automatically update from a central time server to ensure that there is no slippage on the PC’s clock. Follow your Windows XP instructions to understand how to do that.
- Display on Monitor: If you are using more than one monitor and have extended your desktop onto these monitor(s), you can select which monitor you would like Acquire to be displayed on.
- Master Volume Left: Use this slider to select the volume level of the left channel.
-
Master Volume Right: Use this slider to select the volume level of the right channel.
- TIP: Acquire has separate Left and Right channels to allow you to split the content to different screens from the same player if required.
- Protect Config Screen with Password: Adds an extra level of password protection to the existing Sentinel password.
- Performance Optimisations: Allows setting of cache size for apps.
- Disable Windows Vista Aero: Aero uses processor power that could be better allocated to your project.
- Check for Removable Media Updates Now: This checks for updates that are either on USB key/hard drive, CD, DVD, etc.
Player Settings tab
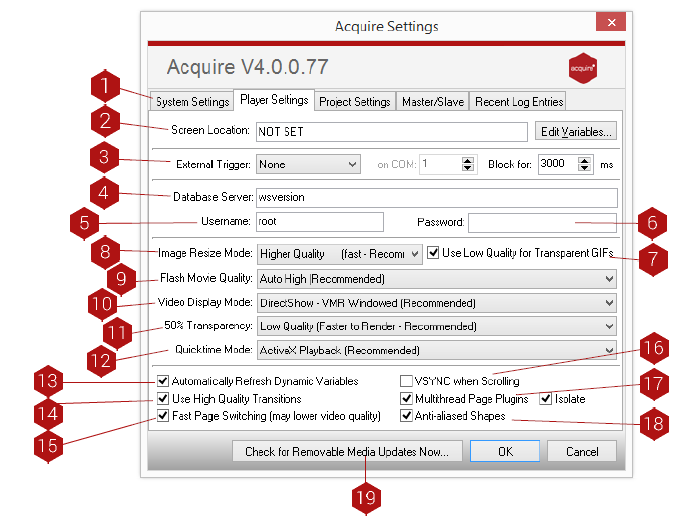
TIP: All of the functions listed within this menu will affect the performance of the delivered project.
key
- Settings Tabs: Here is where you can select which Configuration Setting you would like to change/view.
- Screen Location: Here you can describe where your player is physically located.
- External Trigger: This can be set as a physical device e.g. Numerical keypad, barcode scanner, RS-232 device.
- Database Server: Typically do not change this option.
- Database Username: Typically do not change this option.
- Database Password: Typically do not change this option.
- Use Low Quality for Transparent GIFs: Useful for less powerful players.
- Image Resize Mode: If the player PC has a different screen resolution than the Project was set for, Acquire will resize all of the content to fill the screen. On slower PCs this may cause a slight delay between pages so you can instead perform a quicker but lower quality resize to speed this up.
- Flash Movie Quality: If you are using Flash animations in your project, you may find they will be slow and jerky on slower PCs or at higher resolutions. To reduce processor loading, you can override the Flash animation setting to speed up playback at the cost of lower quality here.
- Video Display Mode: Depending on the graphics card on the Player being used, videos may play back better using one or other of these modes. If the videos are playing back OK, you should not need to change this option.
- 50% Transparency: If you use a PNG graphic with Alpha channel information, you can specify the mask for each pixel being on, off or ‘midway’ (meaning 33%-66%). When this ‘Midway’ is rendered, it is actually created using a sequence of on/off pixels in a pattern. On slower PCs you can choose a simple pattern to use which will speed up page changes containing these masks.
- Quicktime Mode: Choose from ActiveX or Standard Playback.
- Automatically Refresh Dynamic Variables: Usually switched on unless a variable has a very large number of lines of text.
- Use High Quality Transitions: A trade-off with processor load.
- Fast Page Switching: A trade-off with processor load
- VSYNC when Scrolling: Makes scrolling smoother by using the vertical synch function from the graphics card. The downside is that it puts a greater load on the processor.
- Multithread apps: Useful when more than one app is present on a page.
- Anti-aliased Shapes: Smoothes shapes but increases page loading time.
- Check for Removable Media Updates Now: Checks for updates that are either on USB key/hard drive, CD, DVD, etc.
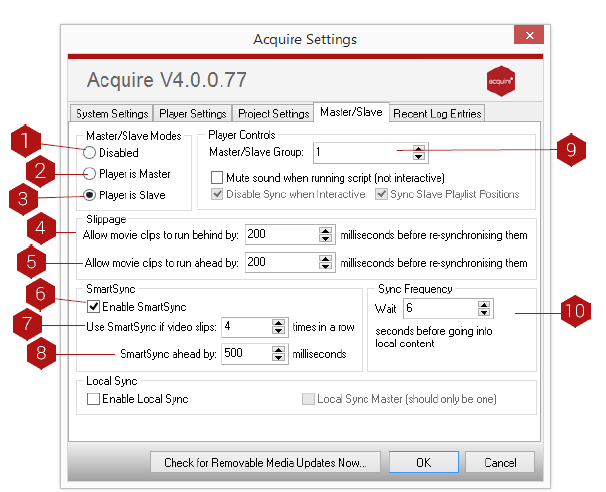
Master/Slave tab
If you have a number of players on the same subnet and want all of the players to play the same playlist simultaneously, you are able to set one of the players to be a ‘master’ machine to send a timing signal to the others using this option. This is ideal when you have a number of kiosks at a site showing a ‘screensaver’ which can then be interacted with.
However, be aware that the Master machine must not be used interactively, otherwise all the ‘slave’ machines will follow this path.
Key
- Disabled: This is the default option, where no Page Synchronisation will operate.
- Player is Master: This option means that this player will broadcast ‘Sync’ messages to all of the players on the local subnet.
-
Player is Slave: This option means that this player will ‘listen’ for messages to sync to.
- TIP: Depending on the option chosen, some or all of the following options may be available.
- Slippage Run Behind: (slave only) as with ‘Run Ahead’ (5), this allows you to change the slippage if the video is not playing fast enough. Typically do not change this option.
- Slippage Run Ahead: (slave only) as players vary in actual processor speed, a small amount of slippage will occur. Any excessive slippage needs to be handled and this setting allows you to choose how much it can slip ahead by. Typically, do not change this setting.
- Enable Smart Sync: This feature monitors for regular slippage in the synchronisation and will jump the video ahead if the SmartSync parameters are met.
- Slip Number: If the video slips outside the Slippage settings (5) & (6) this many times, the video will skip ahead.
-
SmartSync Ahead: This is how far the video will be jumped forwards if SmartSync is used.
- TIP: Depending on the option chosen, some or all of the following options may be available.
- Master / Slave Group: Many different ‘channels’ of synchronisation can be used simultaneously on the same network.
- Sync Frequency: This is how long the player waits for a sync signal on a page change before it reverts to playing its local content.
Recent Log Entries tab
To assist in fault finding, Acquire maintains a constant log of what is happening at all times. You are able to see the most recent log entries within this window. This is useful in identifying the sequence of events in your project and to help in tracking down problems.
Note:
That this information is also stored as a number of log files in the Acquire Player folder and these log files are automatically transferred to the PLUS! Network or onto your update device whenever a deployment is made so that playout reports can be created.
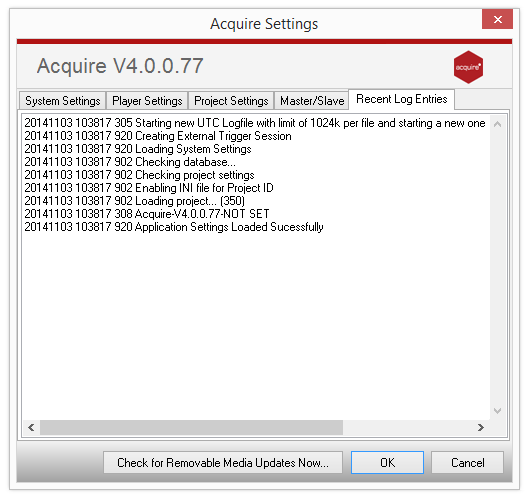
Log Entries - Here are the most recent events that Acquire noted. They are listed by time, a specific logging ID code, and a short deploy listing of the event. You may be asked to report these items if you contact Working Solutions for support.